We’ve already gone through how to get featured images/blog post images to show in MailChimp with the Featured Image in RSS plugin, but perhaps you don’t want to use a plugin. Maybe you’re looking for a way to edit your RSS feed without putting yet another plugin into your WordPress install. Never fear! We can help guide you through this plugin-less route. It’s actually quite simple, and there’s a few different ways to do it. Let’s take a look!
Method 1: Hook into rss2_item
This will be easiest and will likely be the best solution for most users who do not need custom feeds! Simply add this to your theme’s functions.php (and make sure to change the size of the ‘thumbnail’ to whatever is declared in your theme; not sure what this is or means? Read about WordPress image sizes here!) and your /feed should be updated as well!
function add_rss_image() {
        global $post;

        $output = '';
        if ( has_post_thumbnail( $post->ID ) ) {
            $thumbnail_ID = get_post_thumbnail_id( $post->ID );
            $thumbnail = wp_get_attachment_image_src( $thumbnail_ID, 'thumbnail' );

            $output .= '<media:content xmlns:media="http://search.yahoo.com/mrss/" medium="image" type="image/jpeg"';
            $output .= ' url="'. $thumbnail[0] .'"';
            $output .= ' width="'. $thumbnail[1] .'"';
            $output .= ' height="'. $thumbnail[2] .'"';
            $output .= ' />';
        }
        echo $output;
    }
    add_action( 'rss2_item', 'add_rss_image' );
Method 2: Custom Template
What we are going to do is create a custom page template that acts as our modified RSS feed. This is also a great way you can modify your RSS feed to serve only certain content, such as if you have more than one feed going at the same time.
Step 1: Create a new page template
This will reside inside of your WordPress theme’s folder. Much like header.php or footer.php, it will act similarly. If you’ve already made page templates before, you’ll know all of the required information, but we’re going to outline it for all of our first timers.
I am going to name the filename of my page template mailchimp.php. It doesn’t really matter what you name it, but you should make sure to use something that you won’t use in the future or won’t conflict with WordPress. That means probably refrain from using page.php, index.php, archives.php, etc. If you want to be ultra sure, you can also name the file name “rss-mailchimp.php” or otherwise.
Step 2: Add the required information at the top of the page document
Basically this tells WordPress that this file is a template, so it will be selectable on the right sidebar of your pages when you go to make it. Add this at the top:
<?php
/*
Template Name: MailChimp
*/
Again, you can change the “template name” to anything you want, but I am going to name mine simply “MailChimp”
Step 3: Define your RSS items in your page template
You can copy this code to paste into your file after the code from step 2 and it will “just work”, but I will explain some of the items worth looking at to make sure that you have it just the way you want to.
$numposts = 10; // number of posts in feed
$posts = query_posts('showposts='.$numposts.'&cat=-1'); // replace the number 1 with the ID of your tumblelog category
$more = 1;

header('Content-Type: '.feed_content_type('rss-http').'; charset='.get_option('blog_charset'), true);
echo '<?xml version="1.0" encoding="'.get_option('blog_charset').'"?'.'>';
?>

<rss version="2.0"
	xmlns:content="http://purl.org/rss/1.0/modules/content/"
	xmlns:wfw="http://wellformedweb.org/CommentAPI/"
	xmlns:dc="http://purl.org/dc/elements/1.1/"
	xmlns:atom="http://www.w3.org/2005/Atom"
	xmlns:sy="http://purl.org/rss/1.0/modules/syndication/"
	xmlns:slash="http://purl.org/rss/1.0/modules/slash/"
    xmlns:media="http://search.yahoo.com/mrss/"
	<?php do_action('rss2_ns'); ?>
>
<channel>
	<title><?php bloginfo_rss('name'); ?> - <?php wp_title_rss(); ?> - MailChimp Feed</title>
	<atom:link href="<?php self_link(); ?>" rel="self" type="application/rss+xml" />
	<link><?php bloginfo_rss('url') ?></link>
	<description><?php bloginfo_rss("description") ?></description>
	<lastBuildDate><?php echo mysql2date('D, d M Y H:i:s +0000', get_lastpostmodified('GMT'), false); ?></lastBuildDate>
	<language><?php echo get_option('rss_language'); ?></language>
	<sy:updatePeriod><?php echo apply_filters( 'rss_update_period', 'hourly' ); ?></sy:updatePeriod>
	<sy:updateFrequency><?php echo apply_filters( 'rss_update_frequency', '1' ); ?></sy:updateFrequency>
	<?php do_action('rss2_head'); ?>
	<?php while( have_posts()) : the_post(); ?>

	<item>
		<title><?php the_title_rss(); ?></title>
		<link><?php the_permalink_rss(); ?></link>
		<comments><?php comments_link(); ?></comments>
		<pubDate><?php echo mysql2date('D, d M Y H:i:s +0000', get_post_time('Y-m-d H:i:s', true), false); ?></pubDate>
		<dc:creator><?php the_author(); ?></dc:creator>
<?php the_category_rss(); ?>

<?php if (has_post_thumbnail( $post->ID ) ): ?>
  <?php $image_data = wp_get_attachment_image_src( get_post_thumbnail_id( $post->ID ), 'large' );
	$image_width = $image_data[1];
	$image_height = $image_data[2];?>
<?php endif; ?>
 <media:content url="<?php echo $image_data[0]; ?>" width="<?php echo $image_width; ?>" height="<?php echo $image_height; ?>" medium="image" />
		<guid isPermaLink="false"><?php the_guid(); ?></guid>
<?php if (get_option('rss_use_excerpt')) : ?>

		<description><![CDATA[<?php the_excerpt_rss() ?>]]></description>
<?php else : ?>

		<description><![CDATA[<?php the_excerpt_rss() ?>]]></description>
	<?php if ( strlen( $post->post_content ) > 0 ) : ?>

		<content:encoded><![CDATA[<?php the_content() ?>]]></content:encoded>
	<?php else : ?>

		<content:encoded><![CDATA[<?php the_excerpt_rss() ?>]]></content:encoded>
	<?php endif; ?>
<?php endif; ?>

		<wfw:commentRss><?php echo get_post_comments_feed_link(); ?></wfw:commentRss>
		<slash:comments><?php echo get_comments_number(); ?></slash:comments>
<?php rss_enclosure(); ?>
<?php do_action('rss2_item'); ?>

	</item>
	<?php endwhile; ?>

</channel>
</rss>
Explanation of items of interest: $numposts is the number of posts in this feed. You can change it depending on what you’re doing with your feed. $posts, if you change the number on &cat=-1, can make it so your feed only serves posts made to a certain category. For example, if my category “advertising” is category ID 3, and I only wanted to send emails in the advertising category, I would change it to &cat=3
Important thing you need that is not in the standard RSS feed: You’ll notice under RSS version type there is an additional line: xmlns:media=”http://search.yahoo.com/mrss/” MailChimp uses media content blocks to read images, so you will need to first define that you are using this sort of markup with this line. I have then added after the category block
<?php if (has_post_thumbnail( $post->ID ) ): ?>
  <?php $image = wp_get_attachment_image_src( get_post_thumbnail_id( $post->ID ), 'full' ); ?>
<?php endif; ?>
<media:content url="<?php echo $image[0]; ?>" width="800" medium="image" />
Which basically says “if there is a featured image, get the URL for the full size of this featured image”, and then after that says “here is image media, here is the URL of it”, which is what MailChimp will then use to pull the image. You may want to define a width parameter here if you are using the ‘full’ size featured images like I am, so you don’t end up making anyone’s inbox explode! Remember to always preview your campaigns before hitting send.
Step 4A: Make a page that uses this page template
Go into WordPress and click pages, then click add new. You will want to use the page attributes selector to pick your new “mailchimp” (or other name) template. Give your page a desired page slug (I am using /mailchimp, but you might want to use something else), and hit publish. You may also want to noindex this page as well.
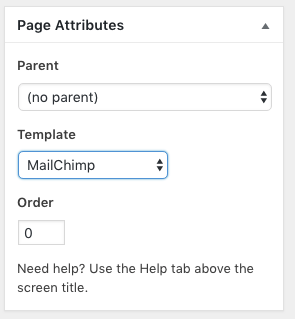
If you don’t see “page attributes”, scroll to the top of the page and click “screen options”, then make sure “page attributes” is checked off. It should show now.

Step 4B: A Different method of adding your template…
Don’t want your template to take up space on your front end somewhere? Never fear! Let’s append it to /feed and keep all our RSS items in one spot. Add this code to functions.php:
add_action('init', 'customRSS');
function customRSS(){
        add_feed('mailchimp', 'customRSSFunc');
}

function customRSSFunc(){
        get_template_part('rss', 'mailchimp');
}
In the above code, it will be looking for a file titled “rss-mailchimp.php”, but if you’ve just named it “mailchimp.php”, that’s OK too, just remove ‘rss’ from the array like so:
get_template_part(‘mailchimp’);
Before you can use your new url, you’ll want to flush your rewrite rules… Head on over to Settings -> Permalinks in WordPress and just hit save without changing anything. That should do it!
Step 4C: Set your RSS language
For english, add this to your functions.php. Check out the full list of RSS Language Codes if you need help figuring out what language to set your RSS. I have the code below set to US english.
function rssLanguage(){
        update_option('rss_language', 'en-US');
}
add_action('admin_init', 'rssLanguage');
Step 5: Load your new URL into MailChimp
Instead of using /feed or /rss in your campaign setup, you’ll now want to use the URL you defined in step 4A. Mine will be http://www.website.com/mailchimp
For step 4B, your url will be http://www.website.com/feed/mailchimp
Step 6: Use the *|RSSITEM:IMAGE|* tag
This doesn’t work out of the box with WordPress and MailChimp, but it should be working now! Just place that merge tag where you want your image to appear, and when you test it, you should now see your featured images showing. Hooray!
Have questions or comments? Let us know below!


This works perfectly!
Thanks 😀
Hi, I tried method one and can’t get it to work. I had also tried the plugin route you recommended and the image won’t display despite having followed all the instructions/recommendations on the plugin’s support page.
For method one, i put in the additional code to the functions page but didn’t understand what you meant about “make sure to change the size of the ‘thumbnail’ to whatever is declared in your theme”. Where would it be declared, and what would need to be changed about the code?
Hi Eli,
Can you give me a little more information about what you’re experiencing?
For method one, “make sure to change the size of the ‘thumbnail’ to whatever is declared in your theme” refers to the size image you want to use. When you install the code provided in your functions.php, you want to look at this line:
$thumbnail = wp_get_attachment_image_src( $thumbnail_ID, 'thumbnail' );Where it says ‘thumbnail’ is where you would substitute the size you want. By default, WordPress has sizes thumbnail (150×150), medium (300 max x 300 max), large (1024 max by 1024 max), and full (the original dimensions of the upload). Thumbnail will often be too small, so you may want to go with medium or large, which means the code will then look like:
$thumbnail = wp_get_attachment_image_src( $thumbnail_ID, 'large' );@Aimee though its easy to understand for most, but you really ought to change
$thumbnail = wp_get_attachment_image_src( $thumbnail_ID, ‘thumbnail’ );
to
$thumbnail = wp_get_attachment_image_src( $thumbnail_ID, ‘thumbnail_size’ );
for some people.
Hi there,
That wouldn’t make sense. “Thumbnail” is an actual size recognized by WordPress. “Thumbnail_size” is not a size recognized by WordPress. The code works out-of-the-box if you copy paste it. I won’t be modifying it.
Hi there,
Method 1 works like a charm for me (I used ‘medium’ for thumbnail size). Thanks a lot !!! I’m looking fort a way to add a radius corner to all the thumbnails. Any idea ?
Glad it worked for you!
As for the radius corner, you’d have to add that to the MailChimp mailer itself. I’m not sure if all email clients will support border-radius, but I imagine you’d need to do one of the following:
Let me know how you make out!
I want to show a default image when there is no featured image is added to the post.
is it possible?
Hey there! You’d probably want to work on an if/else statement that says if there is an image set, use that image, else use the default image.
I have not tested this, but it would probably look like:
function add_rss_image() {
        global $post;

        $output = '';
        if ( has_post_thumbnail( $post->ID ) ) {
            $thumbnail_ID = get_post_thumbnail_id( $post->ID );
            $thumbnail = wp_get_attachment_image_src( $thumbnail_ID, 'thumbnail' );

            $output .= '