Posted by Aimee Cozza on February 15th, 2021
LinkTree is great and often used by many people, especially on Instagram, since you can only share one link and links within the description and comments don’t parse. A LinkTree is a great method of giving people the option to find links to multiple places using the same URL in your bio, so you’re not constantly chasing changing a single link all of the time, and you don’t leave your readers/followers confused.
LinkTree’s concept is great. It’s an awesome platform to use if you don’t know how to custom code your own solution.
The problem with LinkTree…
The biggest problem with LinkTree is that it relies on someone else’s service to supply links to your visitors. If LinkTree is slow, goes down, or, dare I say it, gets banned or marked as spam from Instagram like it does constantly for some users, it could be costing you potentially valuable clickthroughs or even sales. It’s a great service to use in the interim, but you can easily cut out the middle man if you have a WordPress website.
Cutting out the middle man
There’s some additional benefits to cutting out LinkTree. When you’re driving traffic to your own domain, you can see what people are clicking on the most. So if the bulk of your traffic on your links “hub” is driving people to LinkedIn, for example, you’ll be able to track that. You could even create events or goals in Google Analytics to allow you to see the path people travel even easier!
There are a few parts to this that will require you to know at least a basic knowledge of WordPress and CSS. You can follow along or just paste where necessary.
Areas we’ll play with:
- Custom WordPress template
- WordPress page
- Custom CSS styling
- Custom WordPress footer
Step 1: Determine what you do (and don’t want) your links hub to look like
This is important. Take a look at your website on mobile, and decide how different from your website you want your links hub to look. We’re going for a branded version of LinkTree, so we’re going to want to simplify what’s available on the page. This means we’re planning to remove the header and page title (make sure to no-index your page as this is important information for search engines! But this page is not necessarily for search engines, so go ahead and no index it), and remove the bulk of the footer. In the end, since we’re removing resources, this should make the page load faster, too.

We can also start to think about what we want the actual links to look like. If we had a sidebar, we would want to turn it off. We’re thinking it’s going to be super simple: just a list of links that look like buttons. You can certainly make yours more fancy, including adding images if you like, but we think less is more in this instance. We’re also going to limit the width of the page so if someone does view it on desktop, it doesn’t look wonky.
Step 2: Modify the template most like what you want
If you only have one template, then you’ll want to duplicate that template and edit the copy. If you have more than one, like we do, you’ll want to duplicate and edit the one that looks most like your end result. Ours is a full-width boxed page without sidebars, so we’re going to edit that.
Our full-width boxes page without sidebars had a page title and footer, but we removed those. Keep reading and we’ll share the code for this page with you…
Step 3: Modify the footer
We need the get_footer(); hook to finalize out WordPress, or things get weird on the page, so we don’t want to delete get_footer(); entirely. We also want to keep the copyright on the bottom of the page with the privacy policy link, so instead, we’re going to create an alternate footer. We duplicated footer.php and renamed the copy to footer-blank.php. From there, we removed the widget areas (“sidebar”) and only left the copyright and privacy policy link.
<?php
/**
* Footer - Blank
*/
?>
<footer id="footer" class="container-fluid">
</div>
<div class="copyright">© <?php echo date("Y"); ?> <?php bloginfo('name') ?> | <a href="/privacy-policy/">Privacy Policy</a></div>
</footer>
<?php wp_footer(); ?>
</body>
</html>This is good, and all we need from footer-blank.php! Let’s go back to our custom template page. We need to call this new footer instead of the default one by writing replacing get_footer(); with get_footer( ‘blank’ ); Here’s what that looks like now:
<?php
/**
Template Name: Links Hub Page
 */
 get_header(); ?>
 <div class="container-fluid" role="main">
 <div id="main-body" class="row justify-content-md-center">
 <div id="page-content" class="col">
 <!-- Start the Loop /-->
 <?php if ( have_posts() ) : while ( have_posts() ) : the_post(); ?>
 	<!-- Display the Post's content in a div box. -->
 	<div class="entry">
 		<?php the_content(); ?>
 	</div>
 <?php endwhile; else : ?>
 <p><?php esc_html_e( 'Sorry, no posts matched your criteria.' ); ?></p>
 <?php endif; ?>
<!-- End the Loop /-->
 </div>
 </div>
</div>
 <?php
get_footer( 'blank' );
Step 4: Make a new page
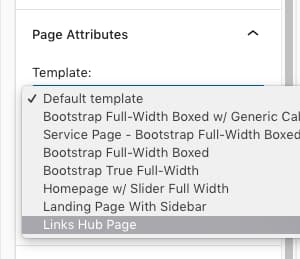
Just like any other WordPress page, go and make a new page. On the right, change your page template from “default” to your new “Links Hub Page”, which will now use this somewhat empty code!
Step 5: Build and stylize!
From here, you can start building your link page using Gutenberg’s standard page building tools. That means you can insert images, links, videos — whatever you want. Keep in mind though that we’re going for a less is more approach to replace LinkTree, so the faster the page loads, the better it will be.
You can stylize your items by using global style parameters for the page template, so you can target .page-template-links-hub-page, for example, and style just for that page so your other pages aren’t affected. Don’t forget to publish your page!
Pro-tip: Make sure you use a short, catchy permalink such as /links or /hub so you don’t forget where your hub is and it’s easy to link to! Shorter links look better, too.
(Advanced) Step 6: Automate!
Now what if I were to tell you that WordPress could insert your latest post links or page links on your website (or art links, or really anything you can think of) without you having to edit the page? That means you don’t have to log in, change one link, and then leave.
This is easy enough to do with a little shortcode! We’re going to put this shortcode into our theme’s functions.php, feel free to use it.
// Shortcode for Links Hub
  function links_hub( $atts ) {
    		$args = array(
            'post_type' => 'post',
            'post_status' => 'publish',
			'orderby' => 'date',
			'order' => 'desc',
			'posts_per_page' => 3,
        );
			$query = new WP_Query( $args );
  ob_start();
  while ( $query->have_posts() ) : $query->the_post();
       echo '<div class="linkblock automatic"><a href="';
	  the_permalink();
	  echo '">Blog Post - ';
	  the_title();
	  echo '</a></div>';
  endwhile;
 wp_reset_postdata();
 return ob_get_clean();
}
add_shortcode('recent-posts-links', 'links_hub');
Now, we can call
as a shortcode block before or after our manual links. This will display our 3 most recent blog posts in descending order (newest first). You will need to style this, otherwise WordPress is just going to give you an unstyled list of links. Here’s our styling:
.linkblock a {
text-align: center;
background-color: #67308f;
padding: 20px;
border: 2px solid #67308f;
margin-left: auto;
margin-right: auto;
display: block;
color: white;
}
.linkblock a:hover {
background-color: #fff;
border: 2px solid #67308f;
color: #67308f;
}
.automatic {
margin-bottom: 15px;
}
.automatic a {
background-color: #0072bc;
border: 2px solid #0072bc;
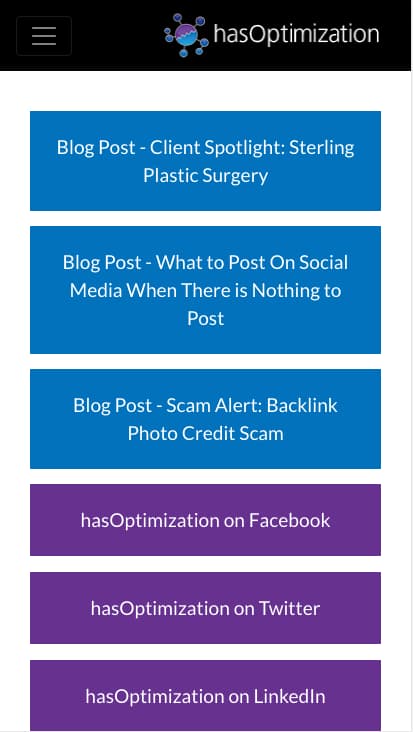
}Our styling also makes these links blue, which is different from the other links, which are purple.
If you have enough know how, you can have WordPress populate anything on your site, including featured images from your blog posts, custom post types… Anything, really! Definitely saves a bit of time and hassle.
Have you gotten rid of LinkTree and used your own custom solution? Tell us what you’re using in the comments below!