Posted by Aimee Cozza on January 30th, 2020
One helpful marketing tool we constantly try to get our clients to leverage is building marketing mailing lists. Building an email marketing list is a great way to get in direct contact with your customers — and potential customers — and can help you when you’re suffering from poor reach on social media platforms. It’s also a better way to make big announcements that go directly to people’s email. I’m sure you know the benefits of an email marketing list, but building one can be a challenge. Typically, clients import their current customers and stop there. There’s a big opportunity for clients to continue building their email marketing lists with lots of potential customers; adding a signup form to the end of a blog post is one way, assuming you are publishing posts people may want to see more of.
A huge signup method to capture new email addresses and potential customers is offering a freebie. That freebie can be anything. As an artist, I personally grow my own email marketing list by offering small Photoshop incentives such as brushes, textures, and mockups. As a business, you may want to offer a professionally developed PDF with special insights into your business, or a portion of your business. Whatever your freebie may be, I’d like to show you how easy it is to automate sending of freebies. Once you set it up, you’ll likely never have to touch it again!
We’re going to assume you already have a freebie sorted, and you have a delivery method as well. MailChimp will only support sending out files 25 mb or smaller, so if your download is larger than that, you will want to use DropBox or Drive to deliver a link to your freebie folks.
Step 1: Set up an interest group
You should already have an audience set up. Setting up Groups is actually a pretty straightforward thing. The trouble comes in where MailChimp likes to bury things a bit, so I’ll show you where exactly to find it.
Log into your MailChimp account.
In the top bar, click Audience.
Then, mid-page, click View Contacts.
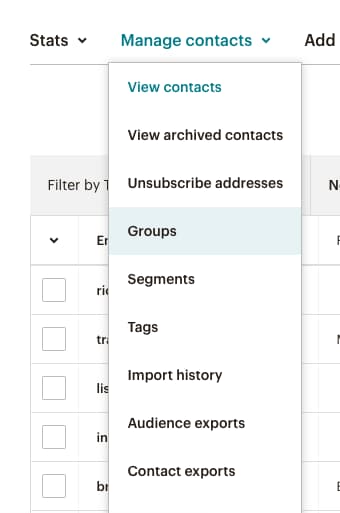
From there, you will want to click Manage contacts, then click on Groups.
From this new screen, you will want to click Create Groups.
You will now be given a few options for this group. As checkboxes (people can select more than one option), as radio buttons (people can only select one), as a dropdown (people can only select one), and don’t show on my signup form. Depending on where you’re collecting your signups (remember, you can use MailChimp’s built in signup forms to collect signups), you may change these settings in the future, but for now let’s just select checkboxes while we set up one freebie.
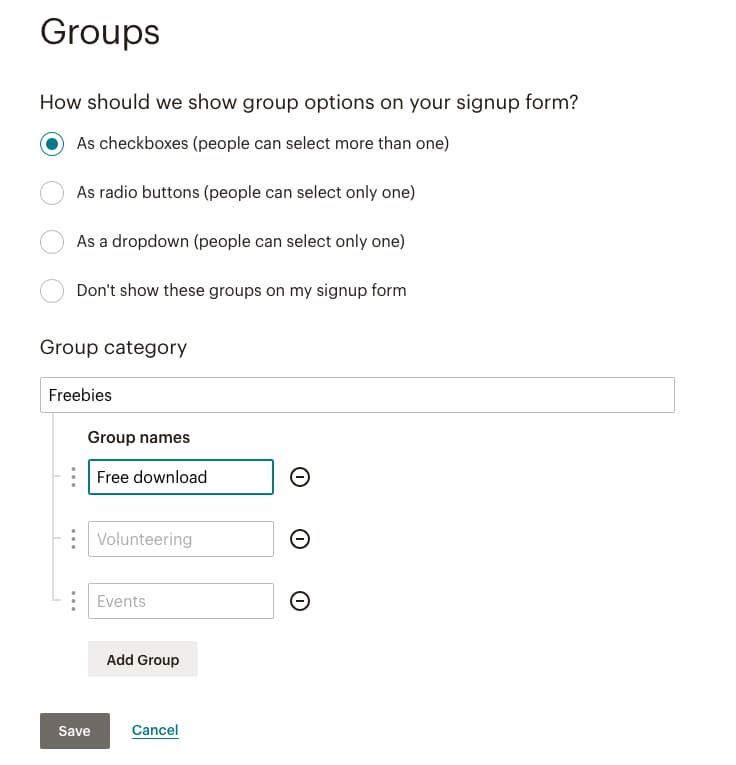
Click Save, and your group will be created!
Step 2: Set up the automation to send to that group
Now, you’re going to want to send to people who just join this group.
In the top bar, click Automate.
Click Email.
You will now be presented with some options. You can use Welcome New Subscribers as the easiest base for your automation. Click on that!
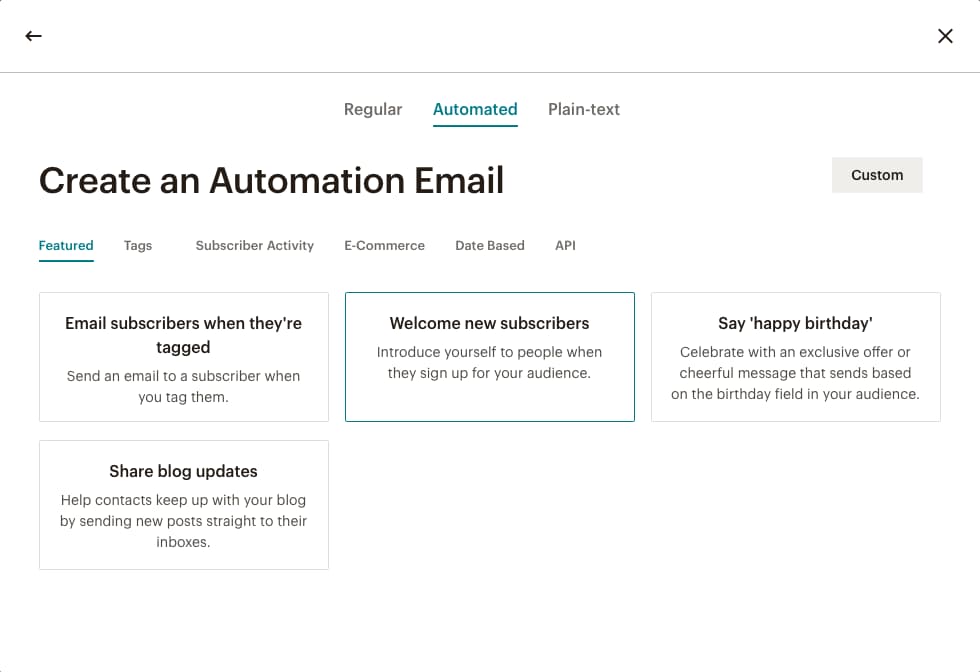
From there, you will want to select your proper Audience and name your campaign as appropriate. You’ll likely only be sending a single email, and if you’re using MailChimp free you won’t be able to make a series, so let’s stick to single email for now. Click Begin.
Here is the screen you will be at now:
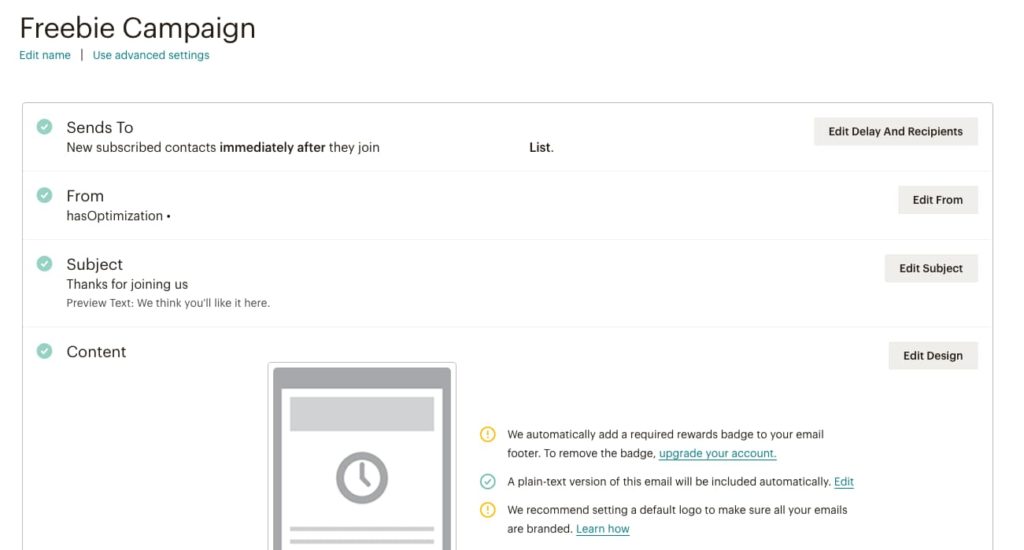
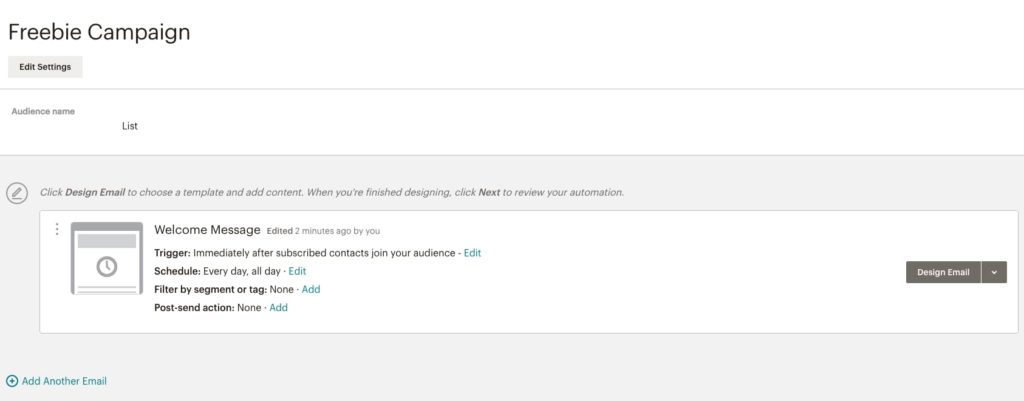
Underneath the campaign name, click “Use advanced settings”, and you will be switched to this screen:
Beside Trigger and Immediately after subscribed contacts join your audience, click Edit. Then, click Change trigger. You will then be given a bunch of options. Click on Audience management, followed by Joins group.
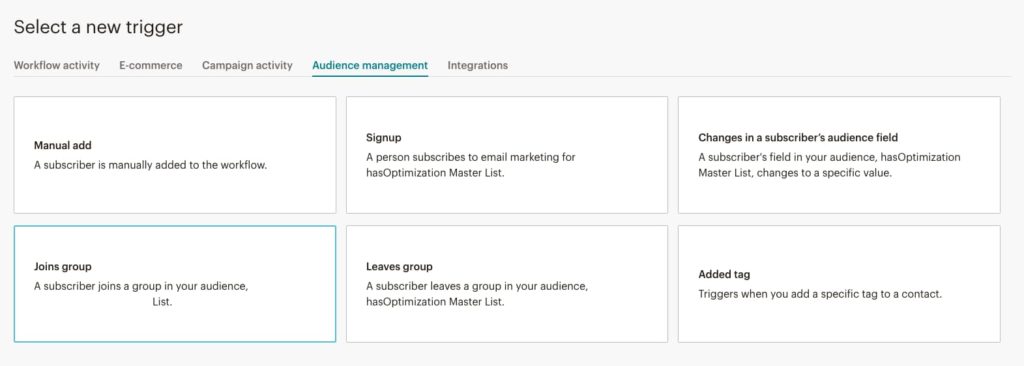
Now, you will have to select what group you want to trigger the automation. Since we called our group “Free download” in the first step, that’s the group we’re going to select. You can also delay your email so it goes out hours after signup, days after signup, or weeks after signup — helpful in some instances!
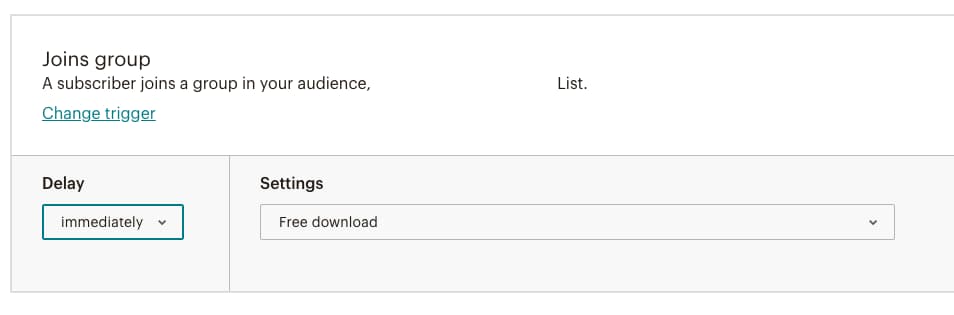
Once you’ve finished this, click Update Trigger in the upper right hand corner of the screen.
Perfect! You can also alter the schedule (maybe you only want to send on certain days?) or other options. For this basic setup, we’re just going to send it all the time immediately after someone signs up.
Step 3: Design your email
I won’t go into detail here, but you should definitely make sure you’re including the download link (likely as a button) in your email design. After you’ve finished designing your email, hit Next, followed by Start Sending.
Step 4: Collect Emails
From here, you will want to start collecting emails that go into that interest group. You can use MailChimp’s automatically made signup forms to easily collect emails, however the downfall is that the person signing up needs to be able to see the interest group and make sure the checkbox is checked off in order to get their freebie. If they forget to do so, they won’t get your email.
To combat this, what I like to do is hide the interest group checkbox and have it automatically be checked. In my particular setup, the person can assume that the signup form that pops up in a modal when they click “download” corresponds with the download they want. You don’t have to use popups, though. You can create individual landing pages per downloadable, and insert signup form code just like mine that hides the interest group.
We’re going to leverage MailChimp’s signup form builder to start some HTML for us, then we will just have to make some small changes to it.
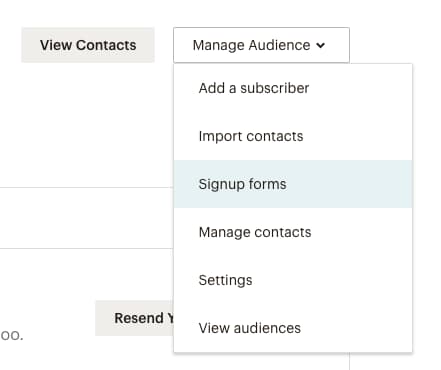
Here’s what it looks like. Head over to MailChimp’s Audience and click Manage Audience followed by Signup Forms.
From there, we’re first going to want to head into Form Builder.
The first thing that loads in should be your signup form, and at the bottom, your new group should be added. If it isn’t, you’ll want to make sure you use the tools on the right sidebar to Add a field and add your group in the signup form. Make sure you save it.
Head back to Signup forms by clicking Signup forms. Click on embedded forms.
I tend to just use the Classic and add/remove fields as necessary. Here’s the signup HTML that MailChimp outputs for me:
<!-- Begin Mailchimp Signup Form -->
<link href="//cdn-images.mailchimp.com/embedcode/classic-10_7.css" rel="stylesheet" type="text/css">
<style type="text/css">
#mc_embed_signup{background:#fff; clear:left; font:14px Helvetica,Arial,sans-serif; }
/* Add your own Mailchimp form style overrides in your site stylesheet or in this style block.
We recommend moving this block and the preceding CSS link to the HEAD of your HTML file. */
</style>
<div id="mc_embed_signup">
<form action="https://hasoptimization.us3.list-manage.com/subscribe/post?u=bc76e0d3e8392041dde8934a8&id=60205e8f4b" method="post" id="mc-embedded-subscribe-form" name="mc-embedded-subscribe-form" class="validate" target="_blank" novalidate>
<div id="mc_embed_signup_scroll">
<h2>Subscribe</h2>
<div class="indicates-required"><span class="asterisk">*</span> indicates required</div>
<div class="mc-field-group">
<label for="mce-EMAIL">Email Address <span class="asterisk">*</span>
</label>
<input type="email" value="" name="EMAIL" class="required email" id="mce-EMAIL">
</div>
<div class="mc-field-group">
<label for="mce-FNAME">First Name </label>
<input type="text" value="" name="FNAME" class="" id="mce-FNAME">
</div>
<div class="mc-field-group">
<label for="mce-LNAME">Last Name </label>
<input type="text" value="" name="LNAME" class="" id="mce-LNAME">
</div>
<div class="mc-field-group">
<label for="mce-COMPANY">Company </label>
<input type="text" value="" name="COMPANY" class="" id="mce-COMPANY">
</div>
<div class="mc-field-group input-group">
<strong>Freebies </strong>
<ul><li><input type="checkbox" value="256" name="group[26557][256]" id="mce-group[26557]-26557-0"><label for="mce-group[26557]-26557-0">Free download</label></li>
</ul>
</div>
<div id="mce-responses" class="clear">
<div class="response" id="mce-error-response" style="display:none"></div>
<div class="response" id="mce-success-response" style="display:none"></div>
</div> <!-- real people should not fill this in and expect good things - do not remove this or risk form bot signups-->
<div style="position: absolute; left: -5000px;" aria-hidden="true"><input type="text" name="b_bc76e0d3e8392041dde8934a8_60205e8f4b" tabindex="-1" value=""></div>
<div class="clear"><input type="submit" value="Subscribe" name="subscribe" id="mc-embedded-subscribe" class="button"></div>
</div>
</form>
</div>
<!--End mc_embed_signup-->I’m going to strip out the CSS and everything except the email address and interest group from the signup form. You may choose to keep some things over others. Here’s what my code looks like now:
<!-- Begin Mailchimp Signup Form -->
<div id="mc_embed_signup">
<form action="https://hasoptimization.us3.list-manage.com/subscribe/post?u=bc76e0d3e8392041dde8934a8&id=60205e8f4b" method="post" id="mc-embedded-subscribe-form" name="mc-embedded-subscribe-form" class="validate" target="_blank" novalidate>
<div id="mc_embed_signup_scroll">
<h2>Subscribe</h2>
<div class="indicates-required"><span class="asterisk">*</span> indicates required</div>
<div class="mc-field-group">
<label for="mce-EMAIL">Email Address <span class="asterisk">*</span>
</label>
<input type="email" value="" name="EMAIL" class="required email" id="mce-EMAIL">
</div>
<div class="mc-field-group input-group">
<strong>Freebies </strong>
<ul><li><input type="checkbox" value="256" name="group[26557][256]" id="mce-group[26557]-26557-0"><label for="mce-group[26557]-26557-0">Free download</label></li>
</ul>
</div>
<div id="mce-responses" class="clear">
<div class="response" id="mce-error-response" style="display:none"></div>
<div class="response" id="mce-success-response" style="display:none"></div>
</div> <!-- real people should not fill this in and expect good things - do not remove this or risk form bot signups-->
<div style="position: absolute; left: -5000px;" aria-hidden="true"><input type="text" name="b_bc76e0d3e8392041dde8934a8_60205e8f4b" tabindex="-1" value=""></div>
<div class="clear"><input type="submit" value="Subscribe" name="subscribe" id="mc-embedded-subscribe" class="button"></div>
</div>
</form>
</div>
<!--End mc_embed_signup-->
Now, we’re going to checkbox which interest group this pertains to. Simply add to the input tag the following word: checked
<input type="checkbox" checked value="256" name="group[26557][256]" id="mce-group[26557]-26557-0">
We also want to hide the group to visitors so they can’t opt out of this particular grouping, so let’s add to the surrounding group a CSS style that hides it.
<div class="mc-field-group input-group" style="display:none;">
Here’s what our final code looks like:
<!-- Begin Mailchimp Signup Form -->
<div id="mc_embed_signup">
<form action="https://hasoptimization.us3.list-manage.com/subscribe/post?u=bc76e0d3e8392041dde8934a8&id=60205e8f4b" method="post" id="mc-embedded-subscribe-form" name="mc-embedded-subscribe-form" class="validate" target="_blank" novalidate>
<div id="mc_embed_signup_scroll">
<h2>Subscribe</h2>
<div class="indicates-required"><span class="asterisk">*</span> indicates required</div>
<div class="mc-field-group">
<label for="mce-EMAIL">Email Address <span class="asterisk">*</span>
</label>
<input type="email" value="" name="EMAIL" class="required email" id="mce-EMAIL">
</div>
<div class="mc-field-group input-group" style="display:none;">
<strong>Freebies </strong>
<ul><li><input type="checkbox" checked value="256" name="group[26557][256]" id="mce-group[26557]-26557-0"><label for="mce-group[26557]-26557-0">Free download</label></li>
</ul>
</div>
<div id="mce-responses" class="clear">
<div class="response" id="mce-error-response" style="display:none"></div>
<div class="response" id="mce-success-response" style="display:none"></div>
</div> <!-- real people should not fill this in and expect good things - do not remove this or risk form bot signups-->
<div style="position: absolute; left: -5000px;" aria-hidden="true"><input type="text" name="b_bc76e0d3e8392041dde8934a8_60205e8f4b" tabindex="-1" value=""></div>
<div class="clear"><input type="submit" value="Subscribe" name="subscribe" id="mc-embedded-subscribe" class="button"></div>
</div>
</form>
</div>
<!--End mc_embed_signup-->
And, how it looks when we actually embed it:
Perfect! Now, you can just place this signup code wherever your description of your freebie download occurs. This code can be used in a popup (if you have a popup plugin like Popup Maker, for example) or just used as a Custom HTML widget or block. Once people fill in their email address and hit subscribe, they’ll automatically get the freebie email.
Step 5: Cleanup
If you’re like me and you use your own signup forms as well as MailChimp’s signup forms, you’ll want to go back to your Audience and Signup forms to remove the interest group from your MailChimp signup form. Now that we have the code output by MailChimp, we can safely do this and still collect subscribers into an interest group. Go ahead and do that!
Step 6: Test it
Remember to test your form after it’s all set up! You can even give our form above a whirl to see it working!
How did you do? Did you find these instructions helpful? What kind of freebie did you offer? Let us know in the comments below!