Posted by Aimee Cozza on August 9th, 2018
One ever-changing situation on social media is that we are often granting access to other users to allow companies (like hasOptimization!) and other people to manage our products for us. Many social media platforms allow you to add users, administrators, managers or otherwise in an easy, straightforward way. However, getting to those access points to actually add people can be confusing. But don’t worry — we’ve got you! Please note that this information changes CONSTANTLY, so this is accurate as of the publication date but could change at any time.
Why add a user?
The quick and easy answer is you’re not sharing your main, administrative account details with everyone you meet that needs to get a job done. You can also attribute certain things to a user (Who made that post? Oh, Aimee did.) and limit the abilities of a user (say you want them to publish posts but not edit your page information, there are often user types for that). We always suggest inviting additional users rather than sharing your main username and password, though it is not possible across all platforms at this time.
We’re covering how to add users to some of the most common account types we handle. Jump directly to:
- How to Add Users to a Facebook Page (Normal users, not Business Manager)
- How to Add Yelp Business Users
- How to Grant Access to a LinkedIn Company Page
- How to Add Users to your Bing Places Listing
- How to Add Users to Google My Business
- How to Add a User to MailChimp
- How to Add a User to a Dreamhost Account
- How to Add Users in WordPress
Services this type of user management is not available on:
- Houzz
- Tumblr
Facebook Page (Not in Business Manager)
Adding a user to a Facebook Page is simple!
- Navigate to your Facebook page. If you don’t know where it is, you can use this link to see all of your owned pages. Click into your page.
- Click “settings” in the upper right hand corner.
- On the left hand sidebar, click “page roles”.
- From this page, you can invite new people to manage your page. Simply type in their name or email address into the box, and make sure that the page role type is correct. You can upgrade or downgrade access later if you forget.

- Once you hit “add” your new user will be invited to edit or manage the page. Sometimes this will show up in an email or in their notifications center. They will need to accept this invite to proceed. A user who does not have a Facebook profile cannot manage a business page. A page cannot be managed at all if you do not have a personal Facebook account.
Yelp for Business
Yelp’s ability to add users is relatively new and has a few sticking points you should be aware of. If the user you invite responds to reviews, their profile picture and name will be attached to the response. Keep this in mind when you manage a page that you are not directly working for.
- Access your Yelp for Business page. You will need to log in to biz.yelp.com, not regular Yelp.com.
- Click on “account settings”. Verify your password.
- On the left, click on “user management” which also has a helpful “new” next to it.
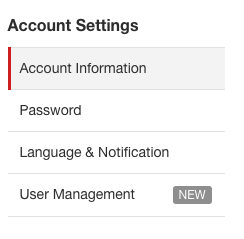
- Invite your new user by email address by clicking “Invite a User”. A user who already has a Yelp account can manage multiple Yelp listings from one profile. There are currently “Job Titles” you can select, but there are no specific access levels tied to those within Yelp at this time. A “customer service” person will have all-access to your Yelp business just as an “owner” or “manager” may.

Bing Places
- Log in to Bing Places at BingPlaces.com
- Click on the listing name of the listing you would like to add users to.
- Click on “manage users” in the teal bar at the top of the page.

- Add the email address of the user you would like to help manage your page. They will receive an email about the new permissions given to them and be prompted to create an account. Click “done” when finished.
LinkedIn Company Page
- Log in to LinkedIn.com
- Click on your “me” profile picture.
- Scroll down to the bottom of the list, under “Manage”. Find your company page and click on it.
- In the upper right hand corner, click on “Admin Tools” followed by “Page admins”
- You can cycle through the designations of the administrators on the left, which are similar to page roles. You then would invite the new user by typing in the new person’s name. You may have to connect with them on LinkedIn before you can make them an administrator. Click “save” when done.

Google My Business
- Log into the user account that has access to the listing.
- Navigate to Google My Business, or use this link.
- Click on the location you want to add a user to.
- On the left hand side, click “Users”.
- Click the icon with two people and a plus sign in the upper right hand corner. Hovering over it says “add new user”.
- You can then add a user by name or email. They will receive an email about their new role with the page and will have to accept the invitation before they can access it. Google My Business has limited page roles, but “Owner” has complete control, “Manager” has most control (however cannot invite other users to work on the Business page), whereas “communications manager” has the least amount of control.

MailChimp
- Log in to your MailChimp account.
- Click on your icon in the upper right hand corner.
- Click on “account”
- Click on “settings”, then click “Users”
- Click on “invite a user”. You can select certain page roles for this user on this screen. If the user already has a MailChimp account, the page will be added to their accounts they can fast switch through. If they do not have an account, they will be prompted via email to create one.

DreamHost
DreamHost allows you to invite people to your account so they can make changes without sharing your credentials. It’s a little hidden, though, so let’s go through it step by step.
- Login to your DreamHost hosting panel.
- In the left hand side, under “Billing & Account”, click “Manage Account”. In the center of the screen, to the right, click “edit privileges” Someone who is invited to manage an account but does not have an account of their own will not have this option.
- Click on “Grant Privileges to a New Person”
- There are then lots of options to give this new person… If they already have an account, they will need to just log in to their account and see the new one has been added. If they do not have an account, they will be prompted to create one.

- User account switching is located under the username, under “change account”.
WordPress
- Log in to your WordPress admin or backend page.
- Hover over “Users” and click “Add new”
- You will then be prompted to fill out information about the new user. You can set a default password for your new user by clicking “show password”. Only username and email address are required fields. Your new user can receive an email about their new account if you check the “Send the new user an email” box. Make sure to select the correct role for your user based on what they will be doing on site. If you are only creating the user to give attribution or author credit, “contributor” will work just fine.